Ephinea Gamepad Setup
Ephinea Phantasy Star Online: Blue Burst supports gamepads, but some additional configuration is needed to make them fully functional. This step-by-step guide shows you how to set up a gamepad for Ephinea, enabling all action shortcuts and improving camera control.
Contents
- Mappings
- Step 1 - Add PSO to Steam
- Step 2 - Enable Steam Input for PSO
- Step 3 - Apply a Steam Button Layout
- Step 4 - Enable Gamepad
- Step 5 - Enable Analog Camera Control
- Step 6 - Update Keyboard Mappings
- Step 7 - Update Gamepad Mappings
- Step 8 - Enable Ctrl Shortcuts
- Step 9 - Finished
- FAQs
- Original Keyboard Mappings
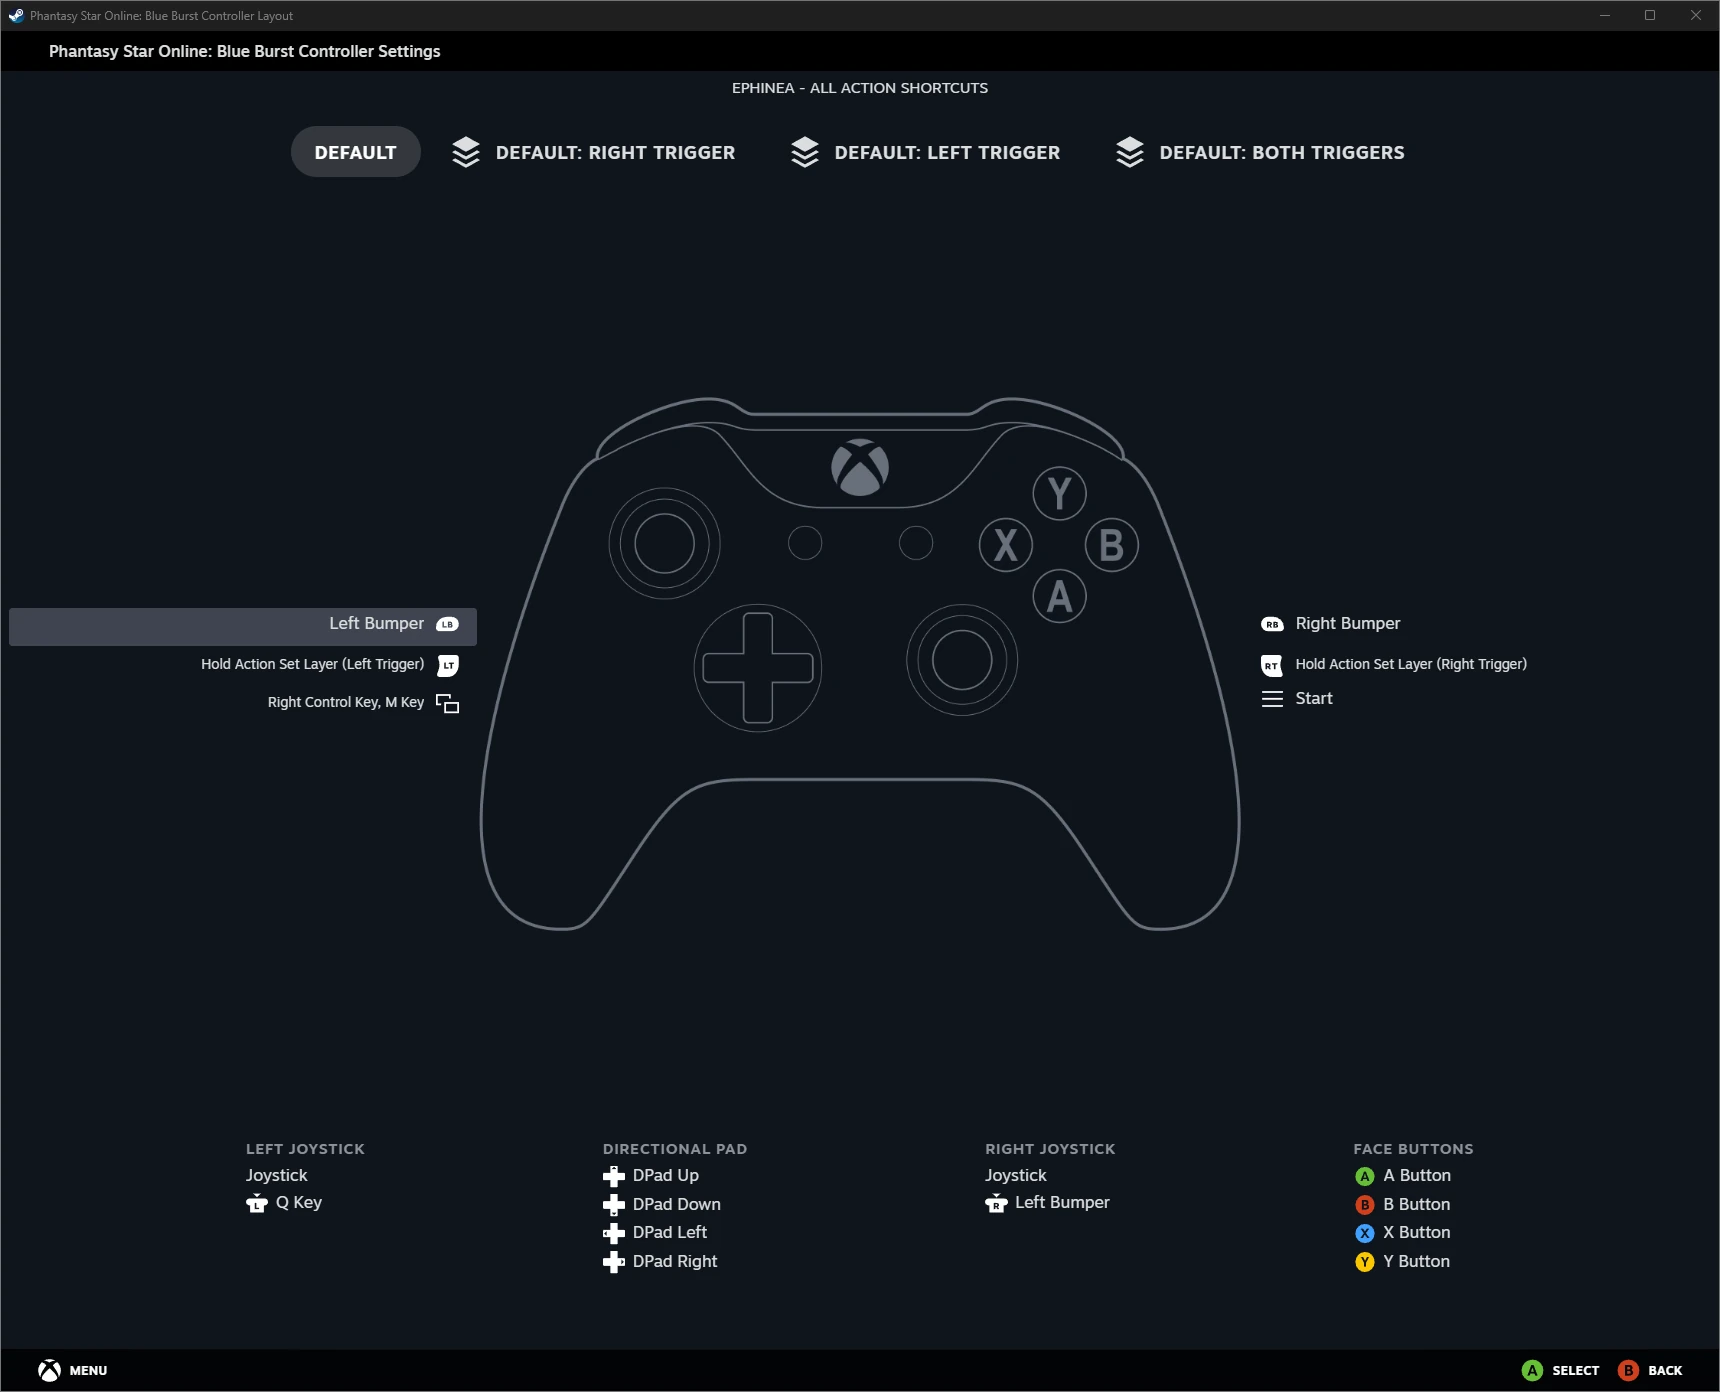
Mappings
Following this guide will result in the button mappings below. The triggers act as modifiers, allowing access to all ten action shortcuts while keeping the main action palette on the face buttons, similar to the original console controls.
Movement
| Gamepad Button | Keyboard Key | Mapping |
|---|---|---|
Left Stick |
WASD |
Move |
Left Stick Click |
Q |
Auto Run |
Right Stick |
Adjust Camera | |
Right Stick Click |
↑ |
Center Camera |
LB |
↑ |
Center Camera / Prev Page |
Action Palette
| Gamepad Button | Keyboard Key | Mapping |
|---|---|---|
A |
↓ |
Action Palette Middle |
B |
→ |
Action Palette Right |
X |
← |
Action Palette Left |
Y |
End |
Action Palette Top |
RB |
Ctrl |
Change Action Palette / Next Page |
Action Shortcuts
| Gamepad Button | Keyboard Key | Mapping |
|---|---|---|
RT + A |
1 |
Action Shortcut 1 |
RT + X |
2 |
Action Shortcut 2 |
RT + B |
3 |
Action Shortcut 3 |
RT + Y |
4 |
Action Shortcut 4 |
LT + A |
5 |
Action Shortcut 5 |
LT + X |
6 |
Action Shortcut 6 |
LT + B |
7 |
Action Shortcut 7 |
LT + Y |
8 |
Action Shortcut 8 |
RT + LT + A |
9 |
Action Shortcut 9 |
RT + LT + X |
0 |
Action Shortcut 10 |
Other
| Gamepad Button | Keyboard Key | Mapping |
|---|---|---|
Menu |
Home |
Main Menu |
View |
Ctrl + M |
Map |
RT + LT + B |
Esc |
Cancel |
RT + LT + Y |
Tab |
Character Info. Change |
RT + ↑ |
F1 |
Display F Key Functions |
RT + → |
F2 |
Equipment |
RT + ↓ |
F3 |
Technique |
RT + ← |
F4 |
Mag |
LT + ↑ |
F5 |
Guild Card |
LT + → |
F6 |
Simple Mail |
LT + ↓ |
F7 |
Symbol Chat |
LT + ← |
F8 |
Team |
RT + LT + ↑ |
F9 |
Team Log Window On/Off |
RT + LT + → |
F10 |
Normal/Change Team Chat |
RT + LT + ↓ |
F11 |
Keyboard Control On/Off |
RT + LT + ← |
F12 |
Main Menu |
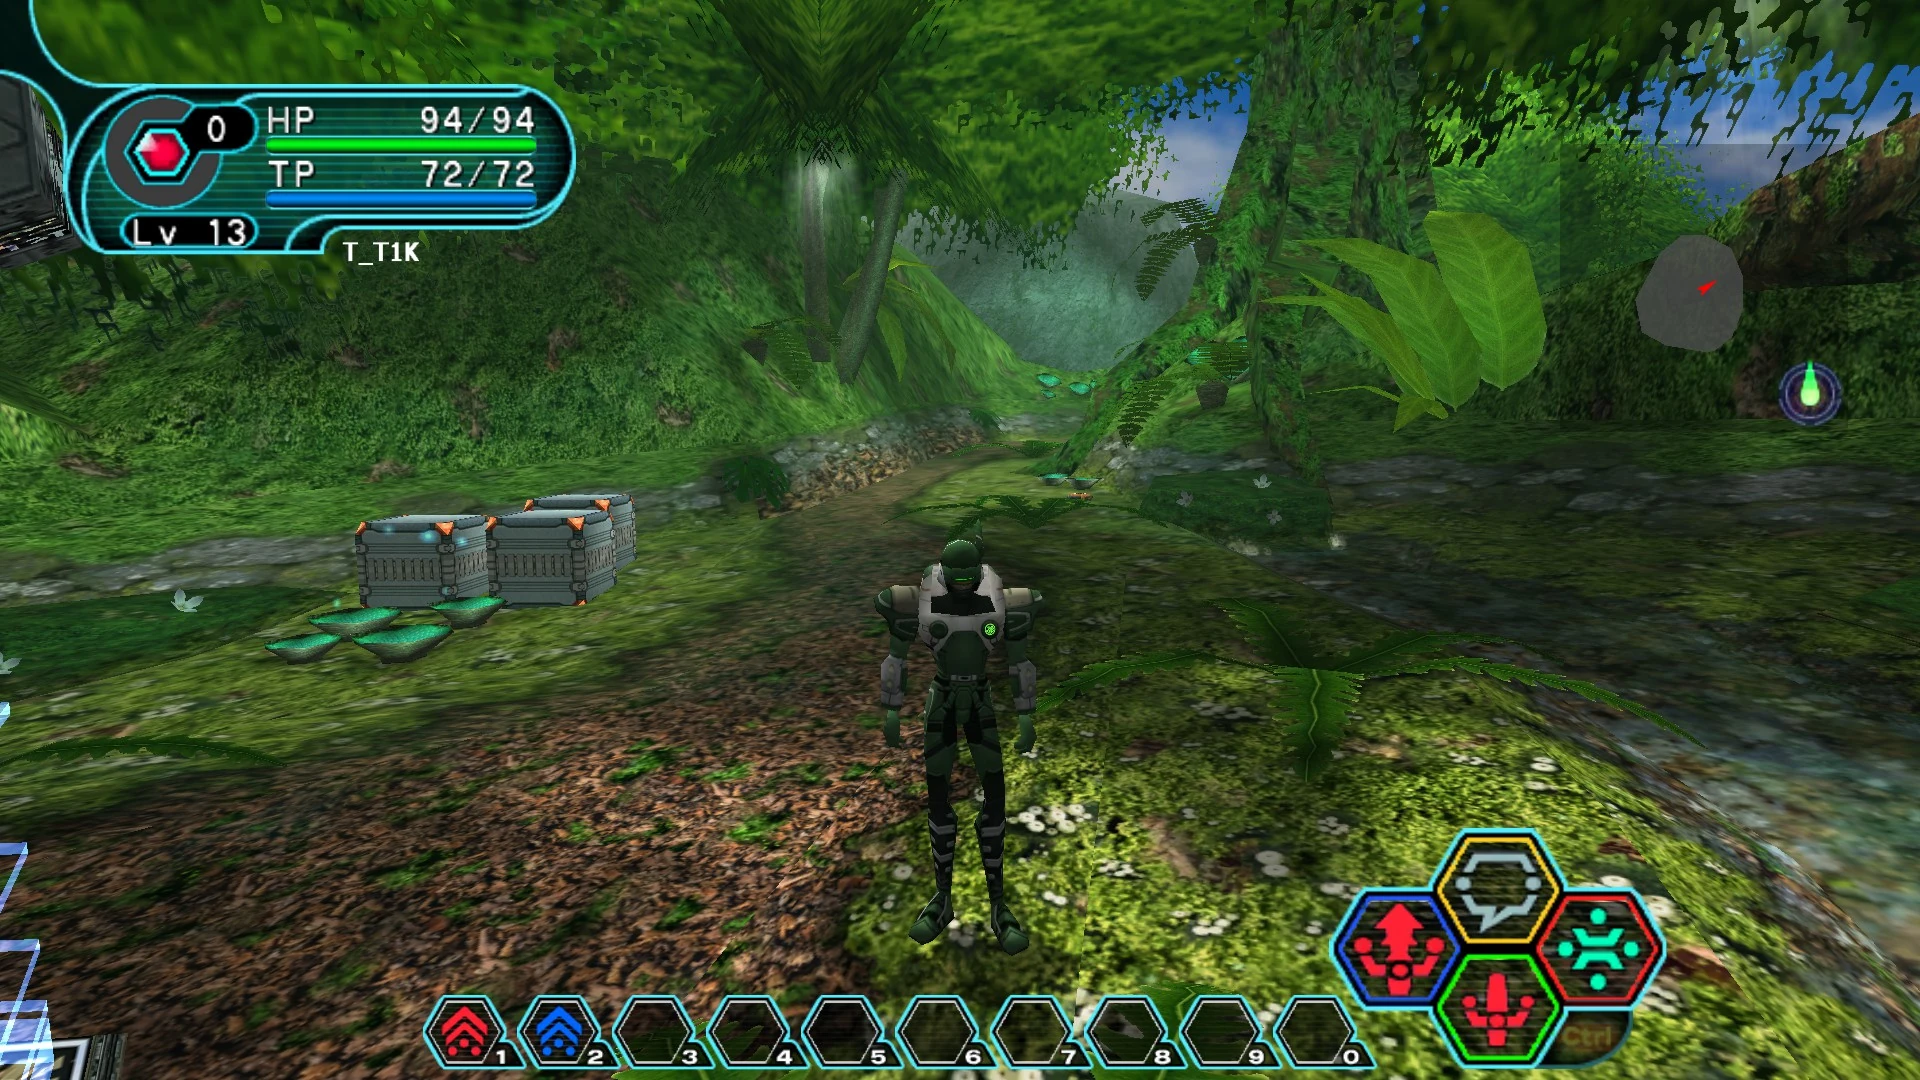
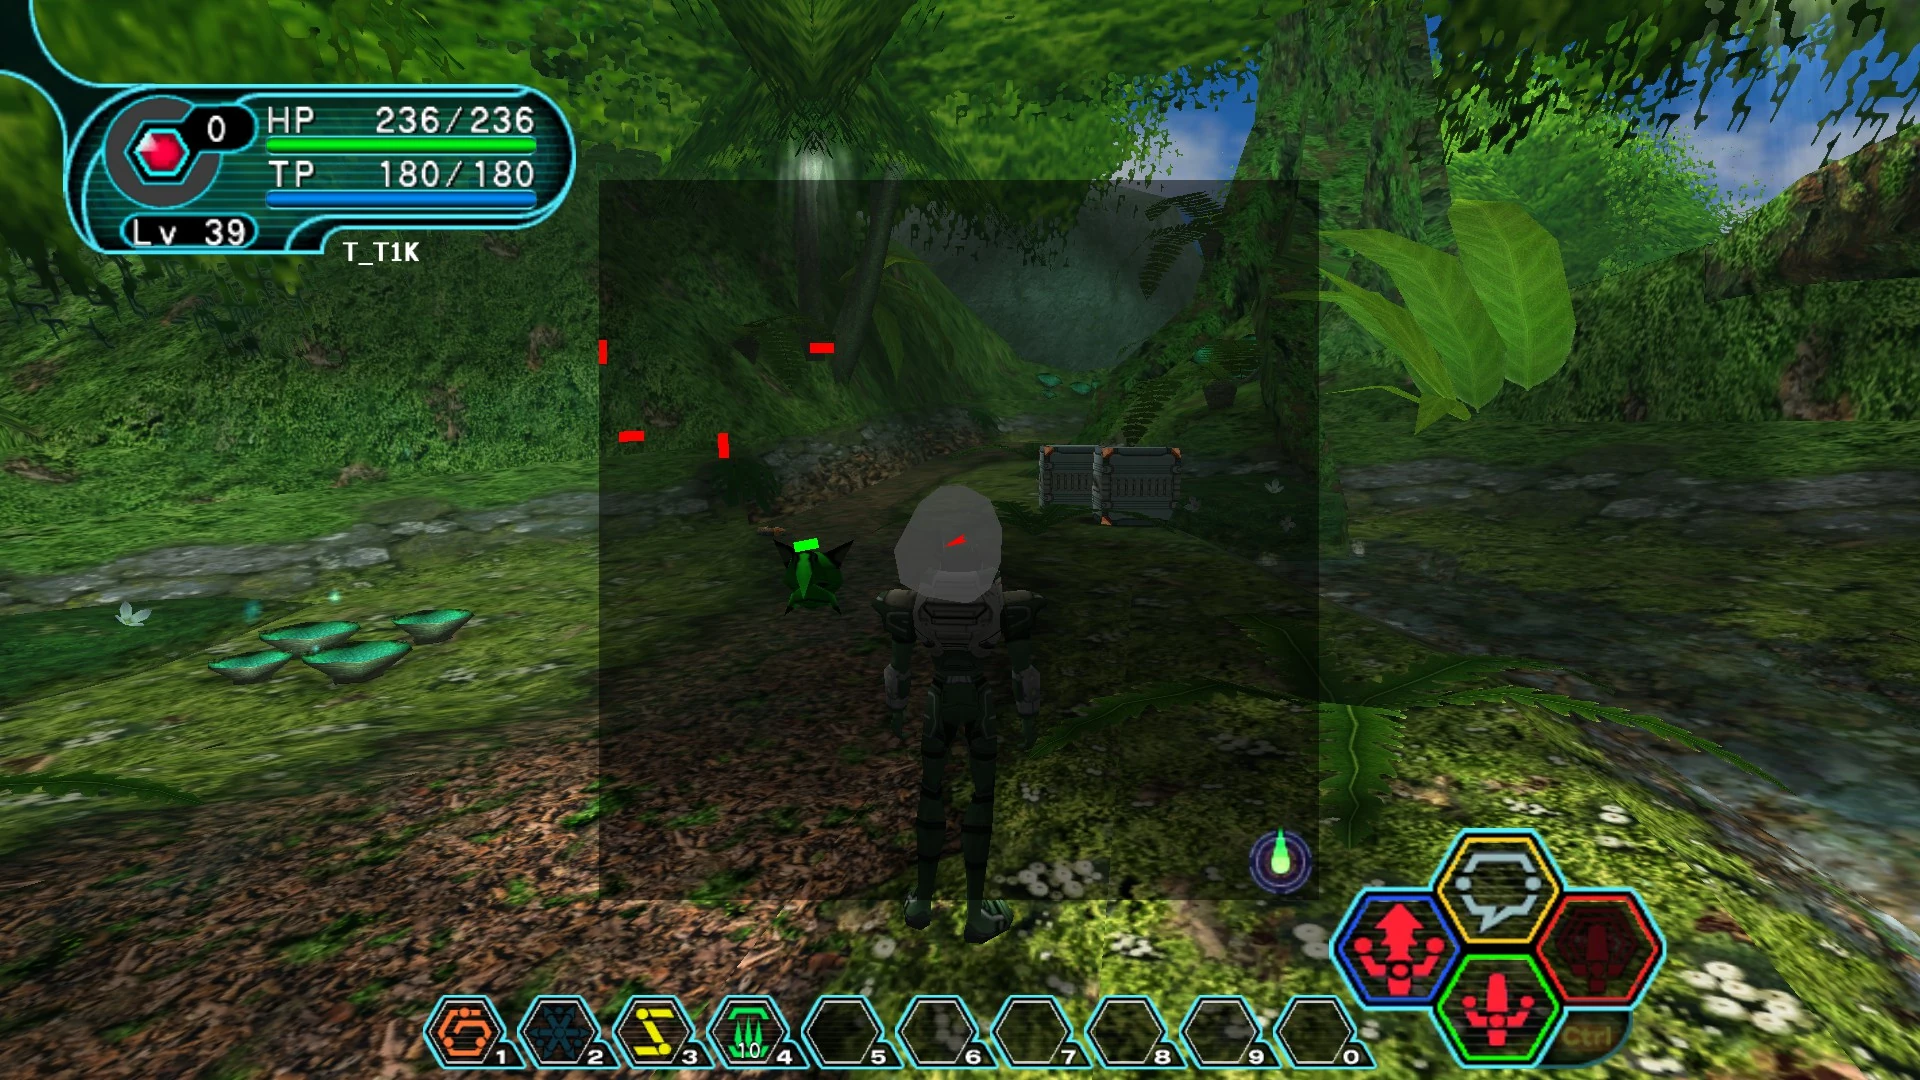
Example
In the screenshot below:
- Shifta is assigned to Action Shortcut 1 and can be executed by pressing
RT + A. - Deband is assigned to Action Shortcut 2 and can be executed by pressing
RT + X.
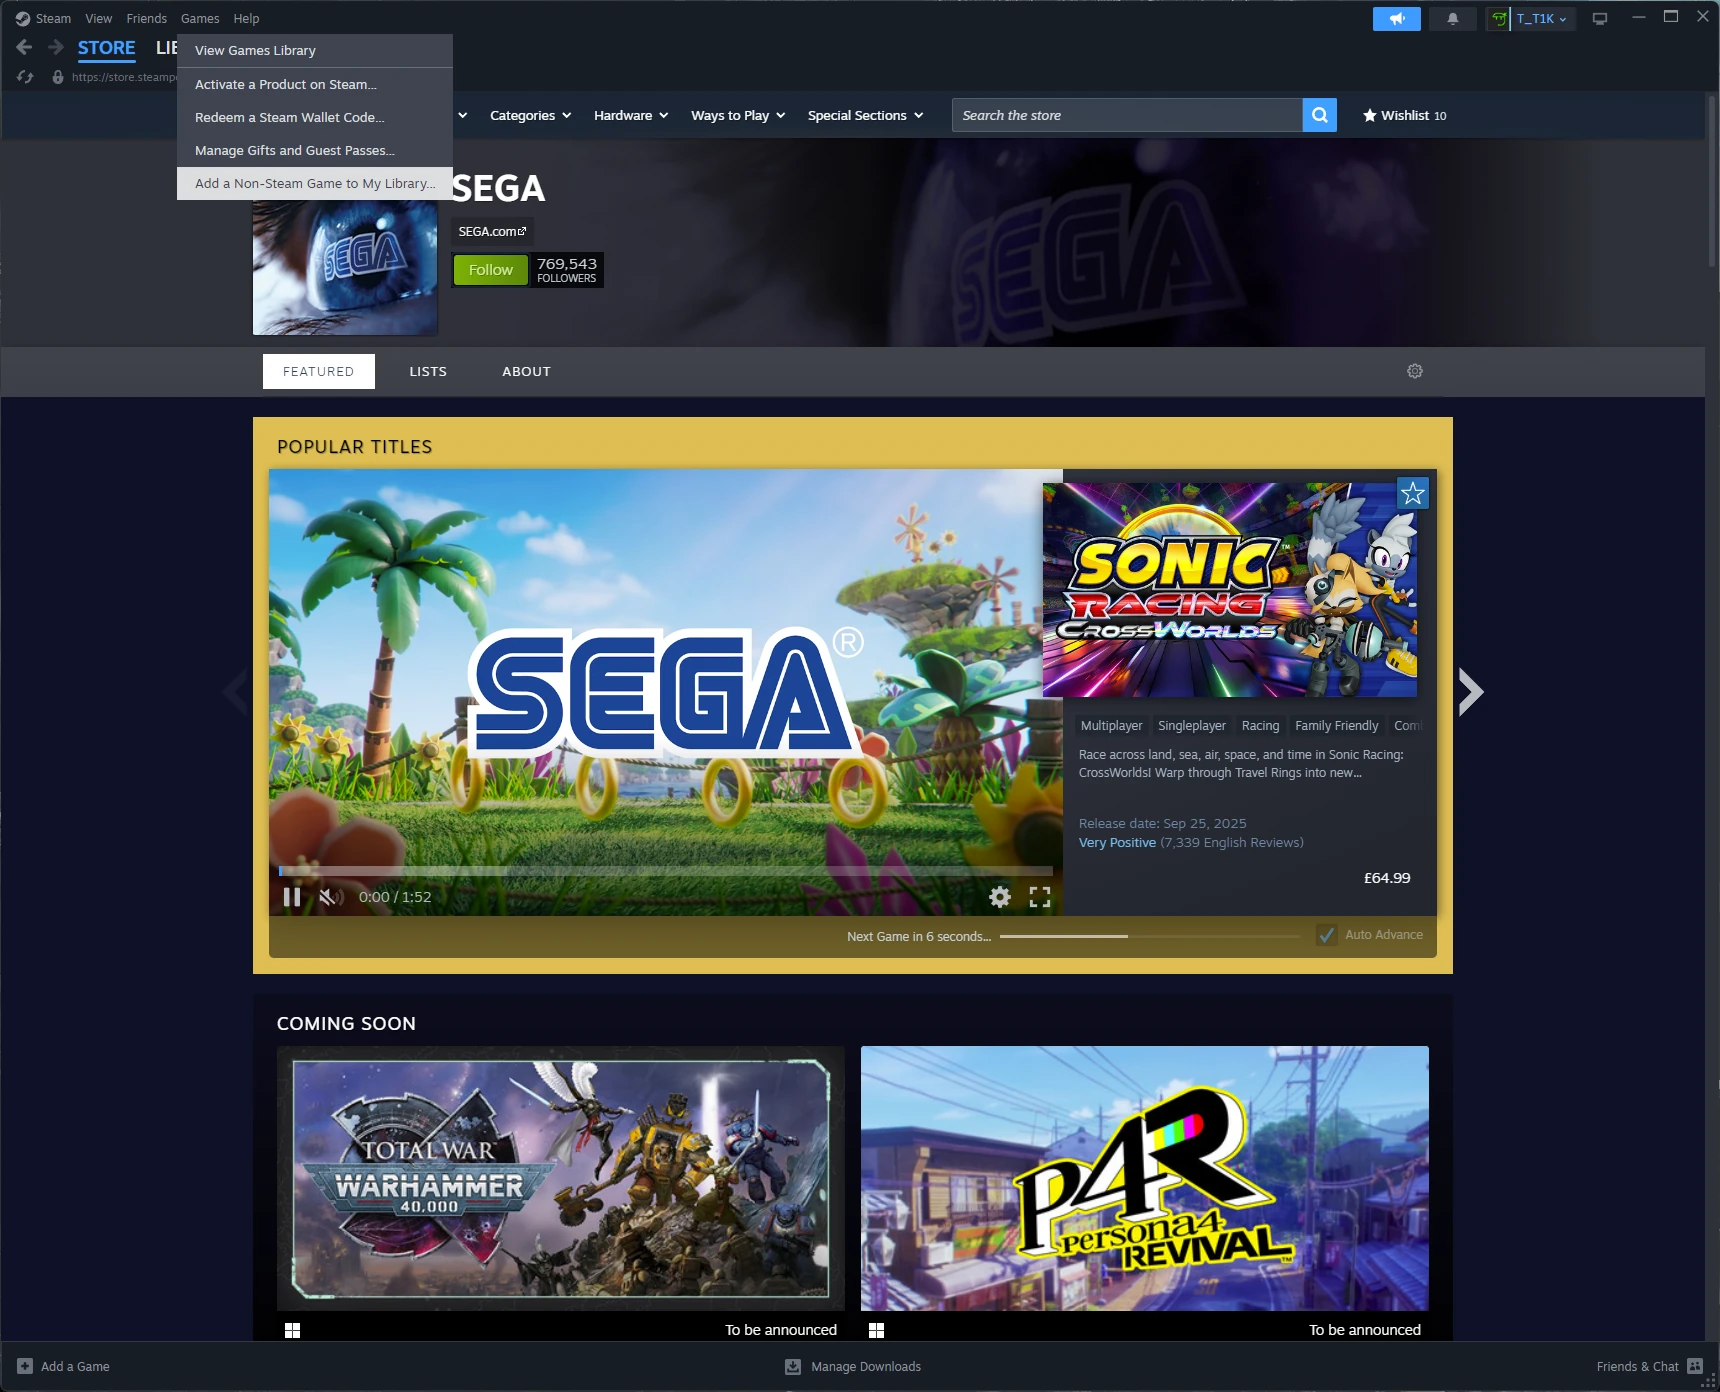
Step 1 - Add PSO to Steam
Adding PSO to Steam allows you to use Steam Input to map your gamepad to keyboard controls.
- Click Games → Add a Non-Steam Game to my Library….
- Browse to your PSO installation (e.g.
C:\Users\Username\EphineaPSO). - Select
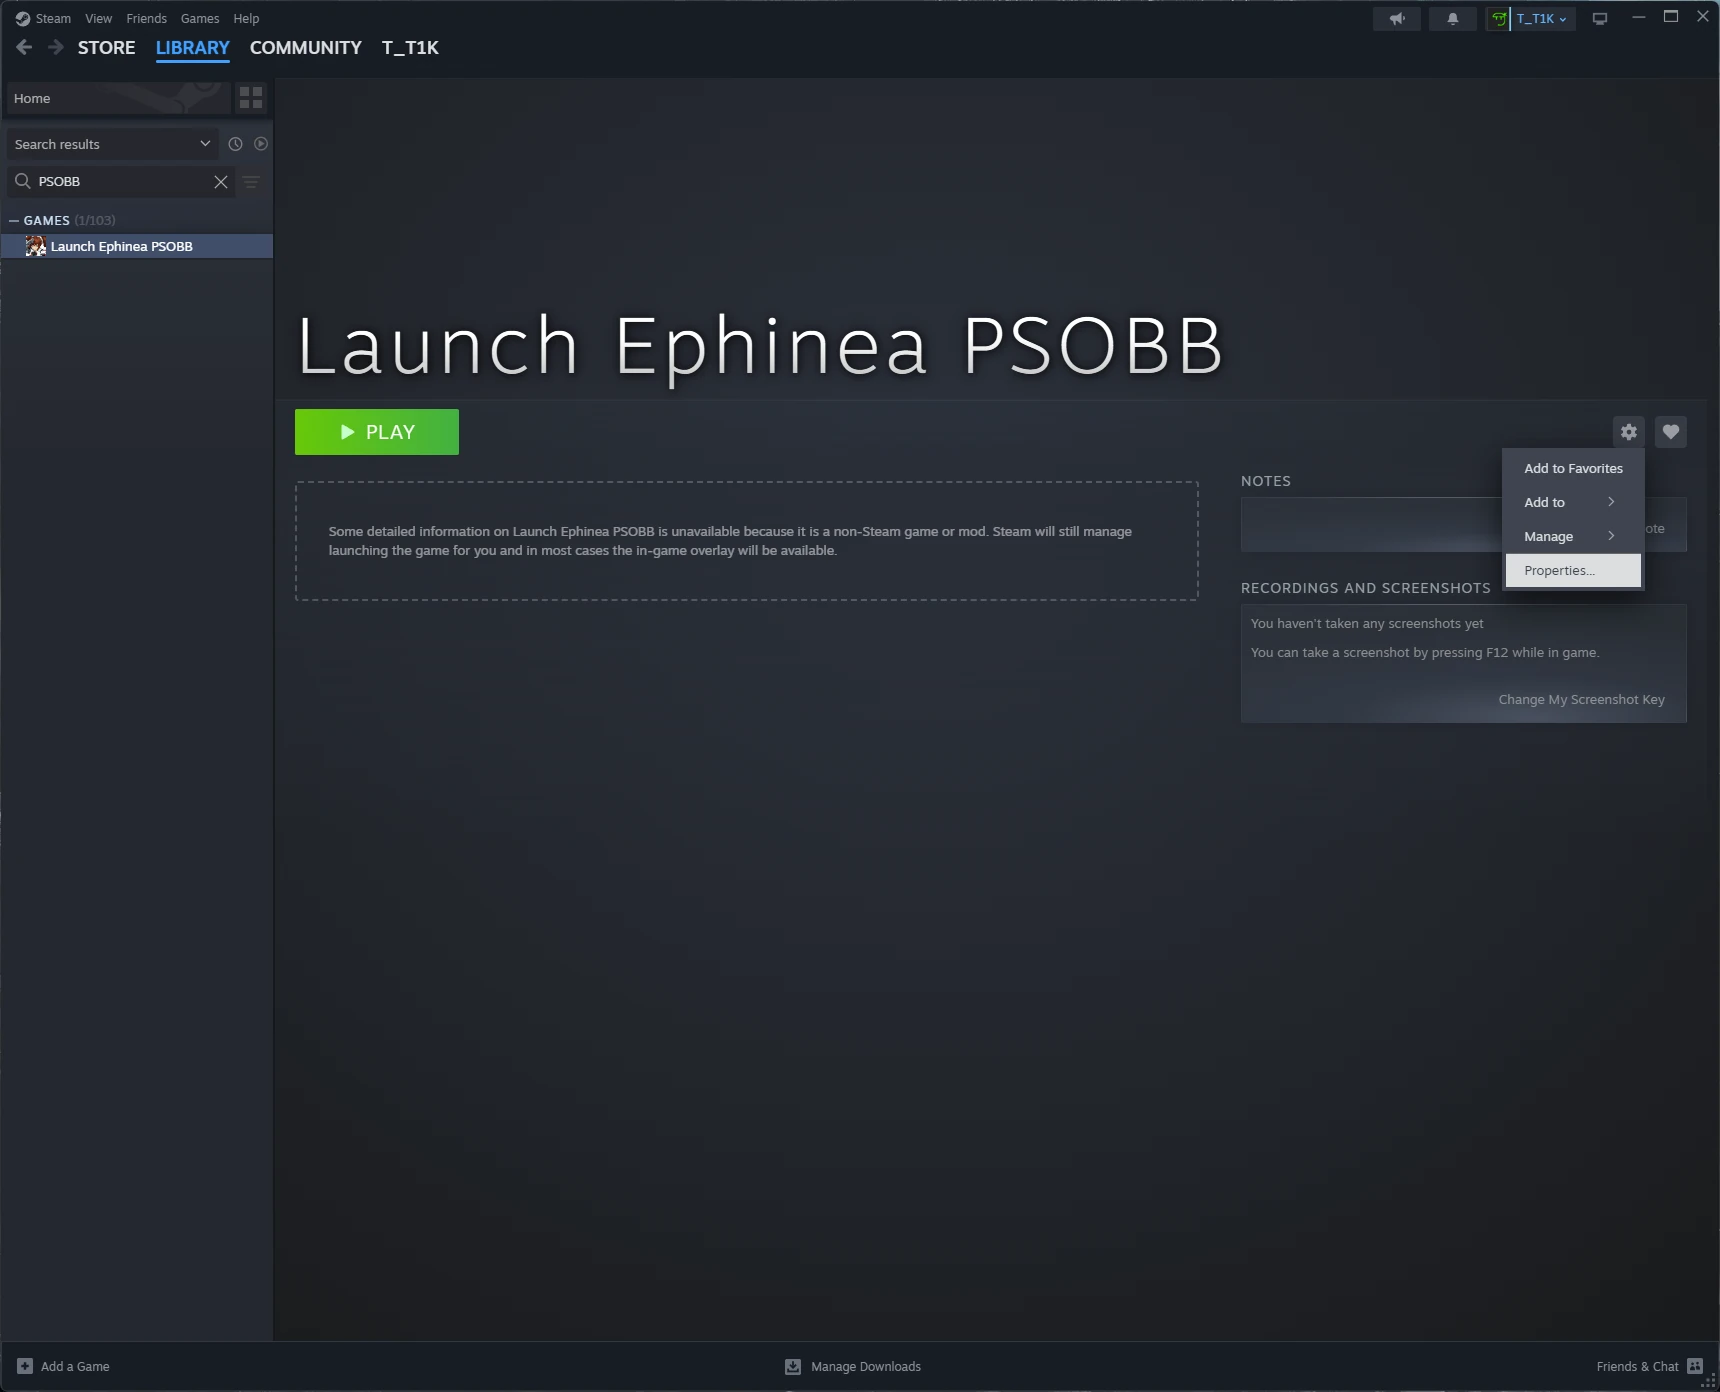
online.exe. - Find the new entry in your library.
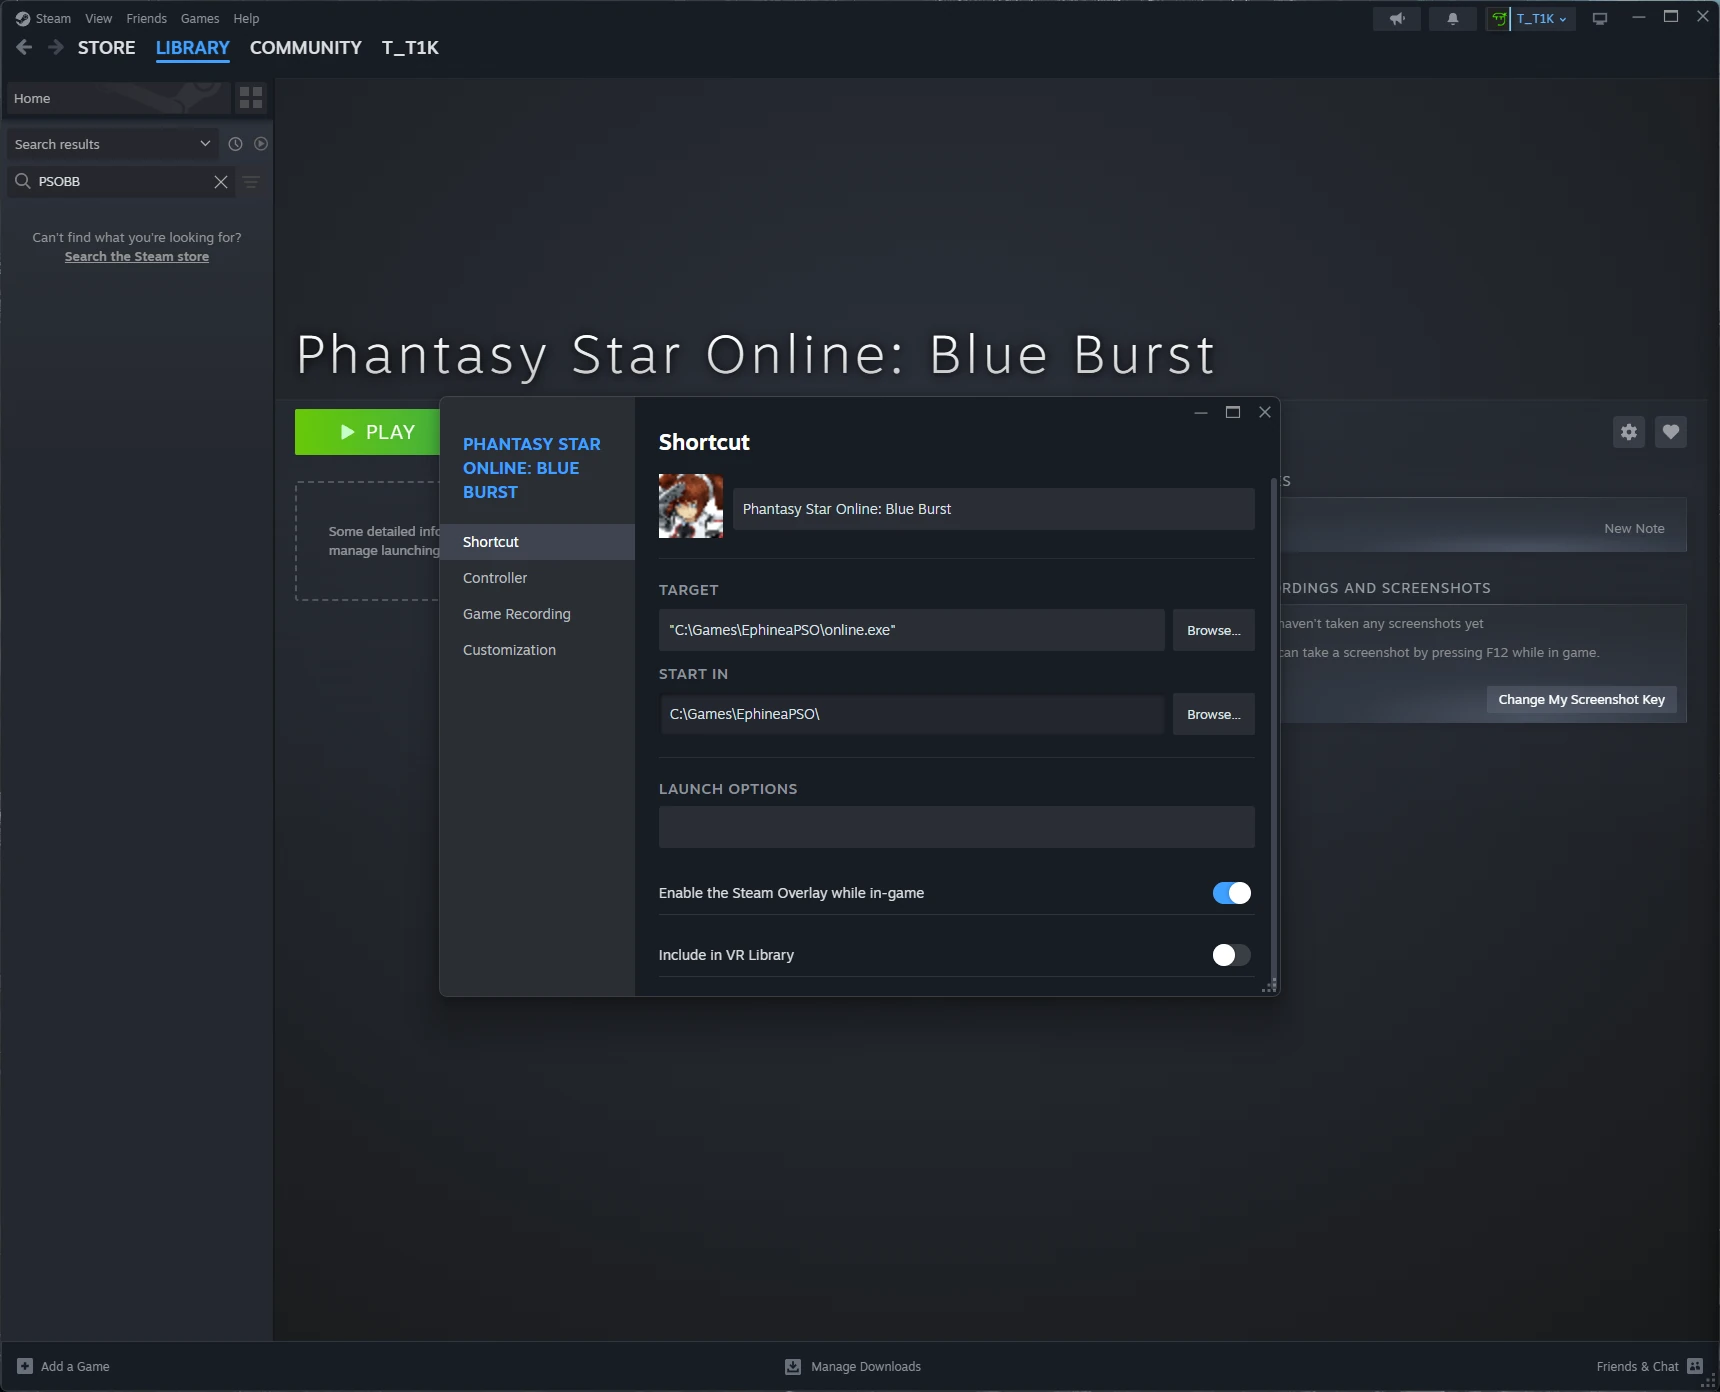
- Click Manage → Properties.
- Rename the shortcut to Phantasy Star Online: Blue Burst.
Step 2 - Enable Steam Input for PSO
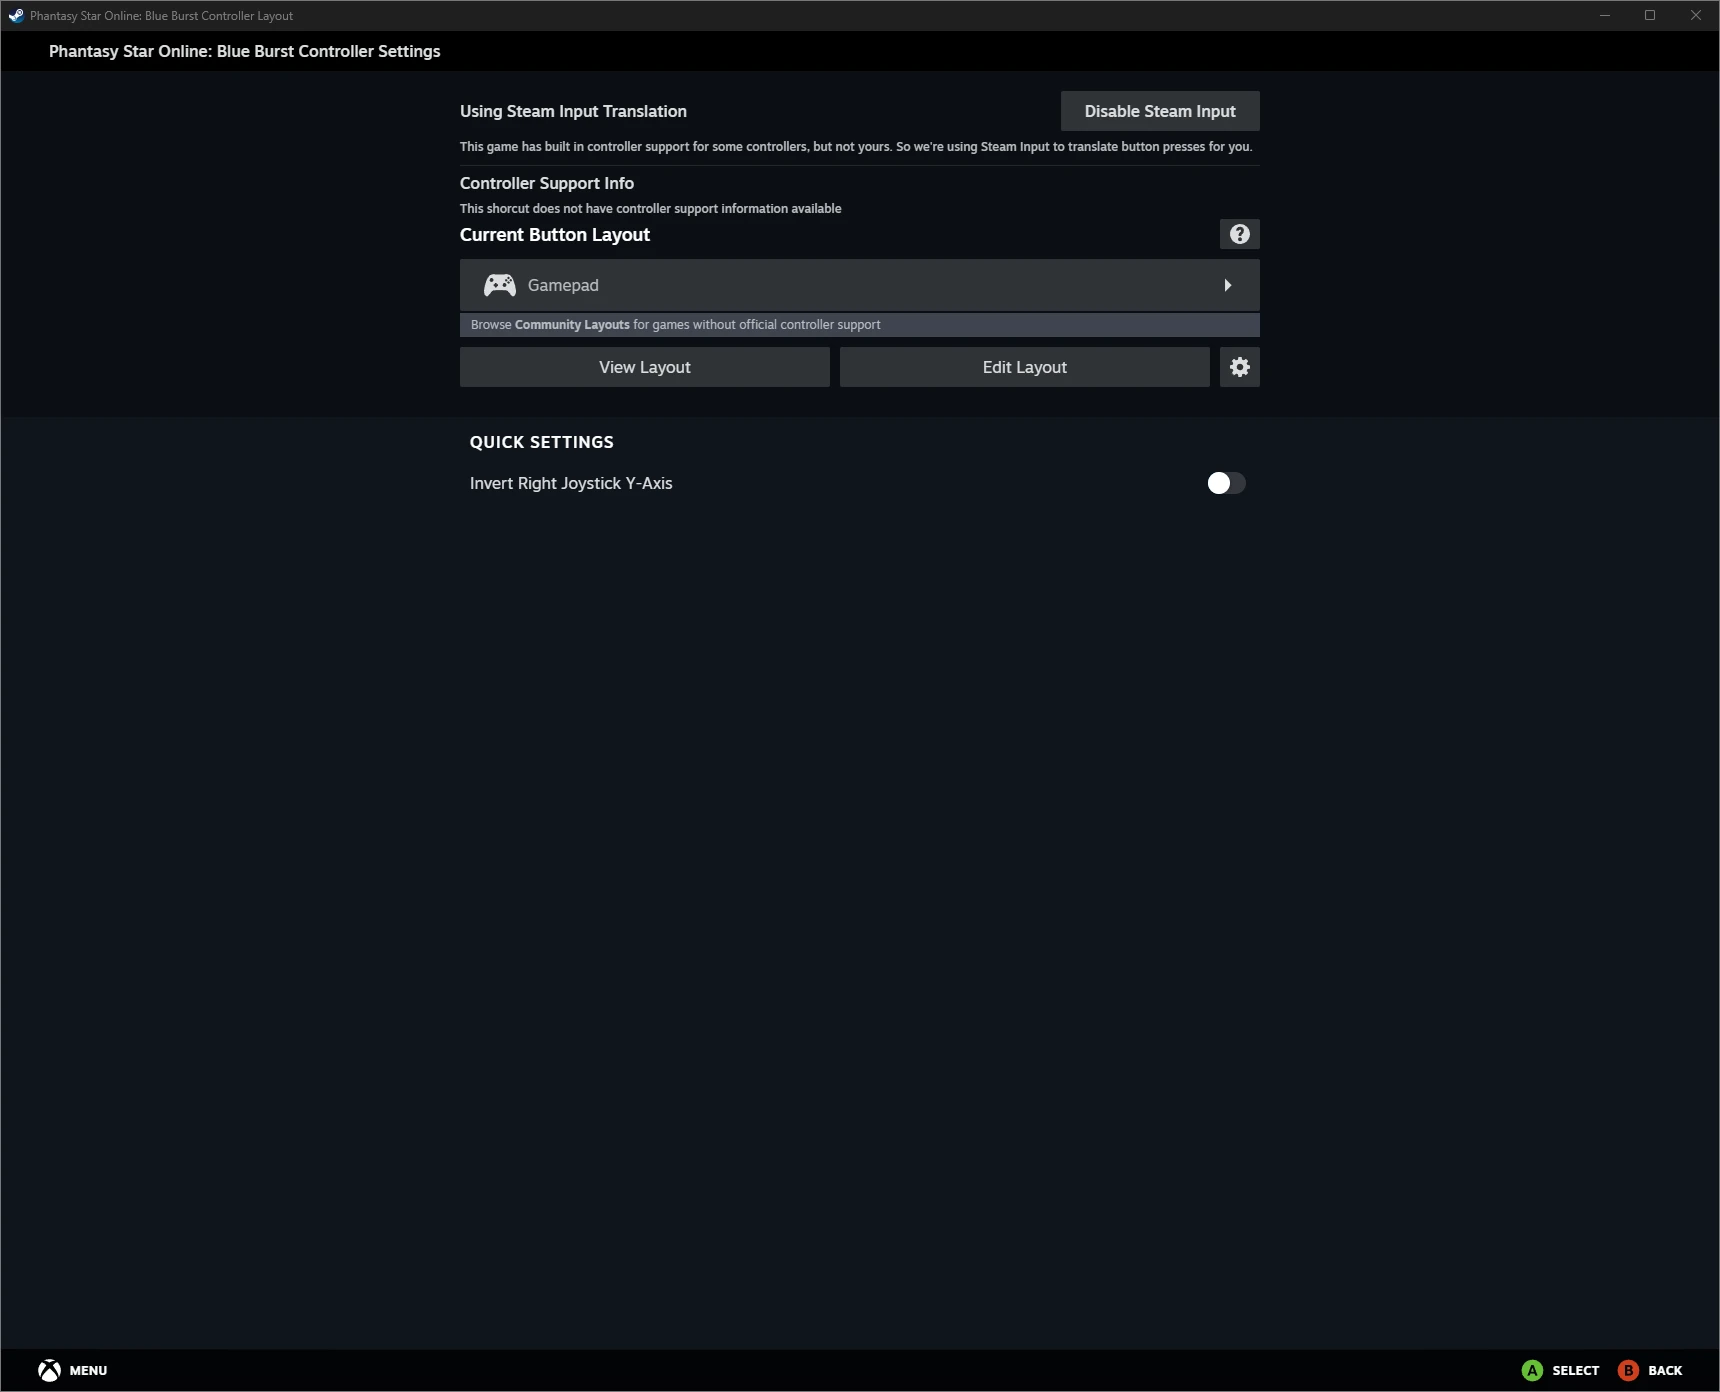
Once your gamepad is connected, enable Steam Input for PSO.
- Click Controller Settings.
- Click Enable Steam Input.
Tip: Most modern controllers, including the PlayStation 5 DualSense, are supported.


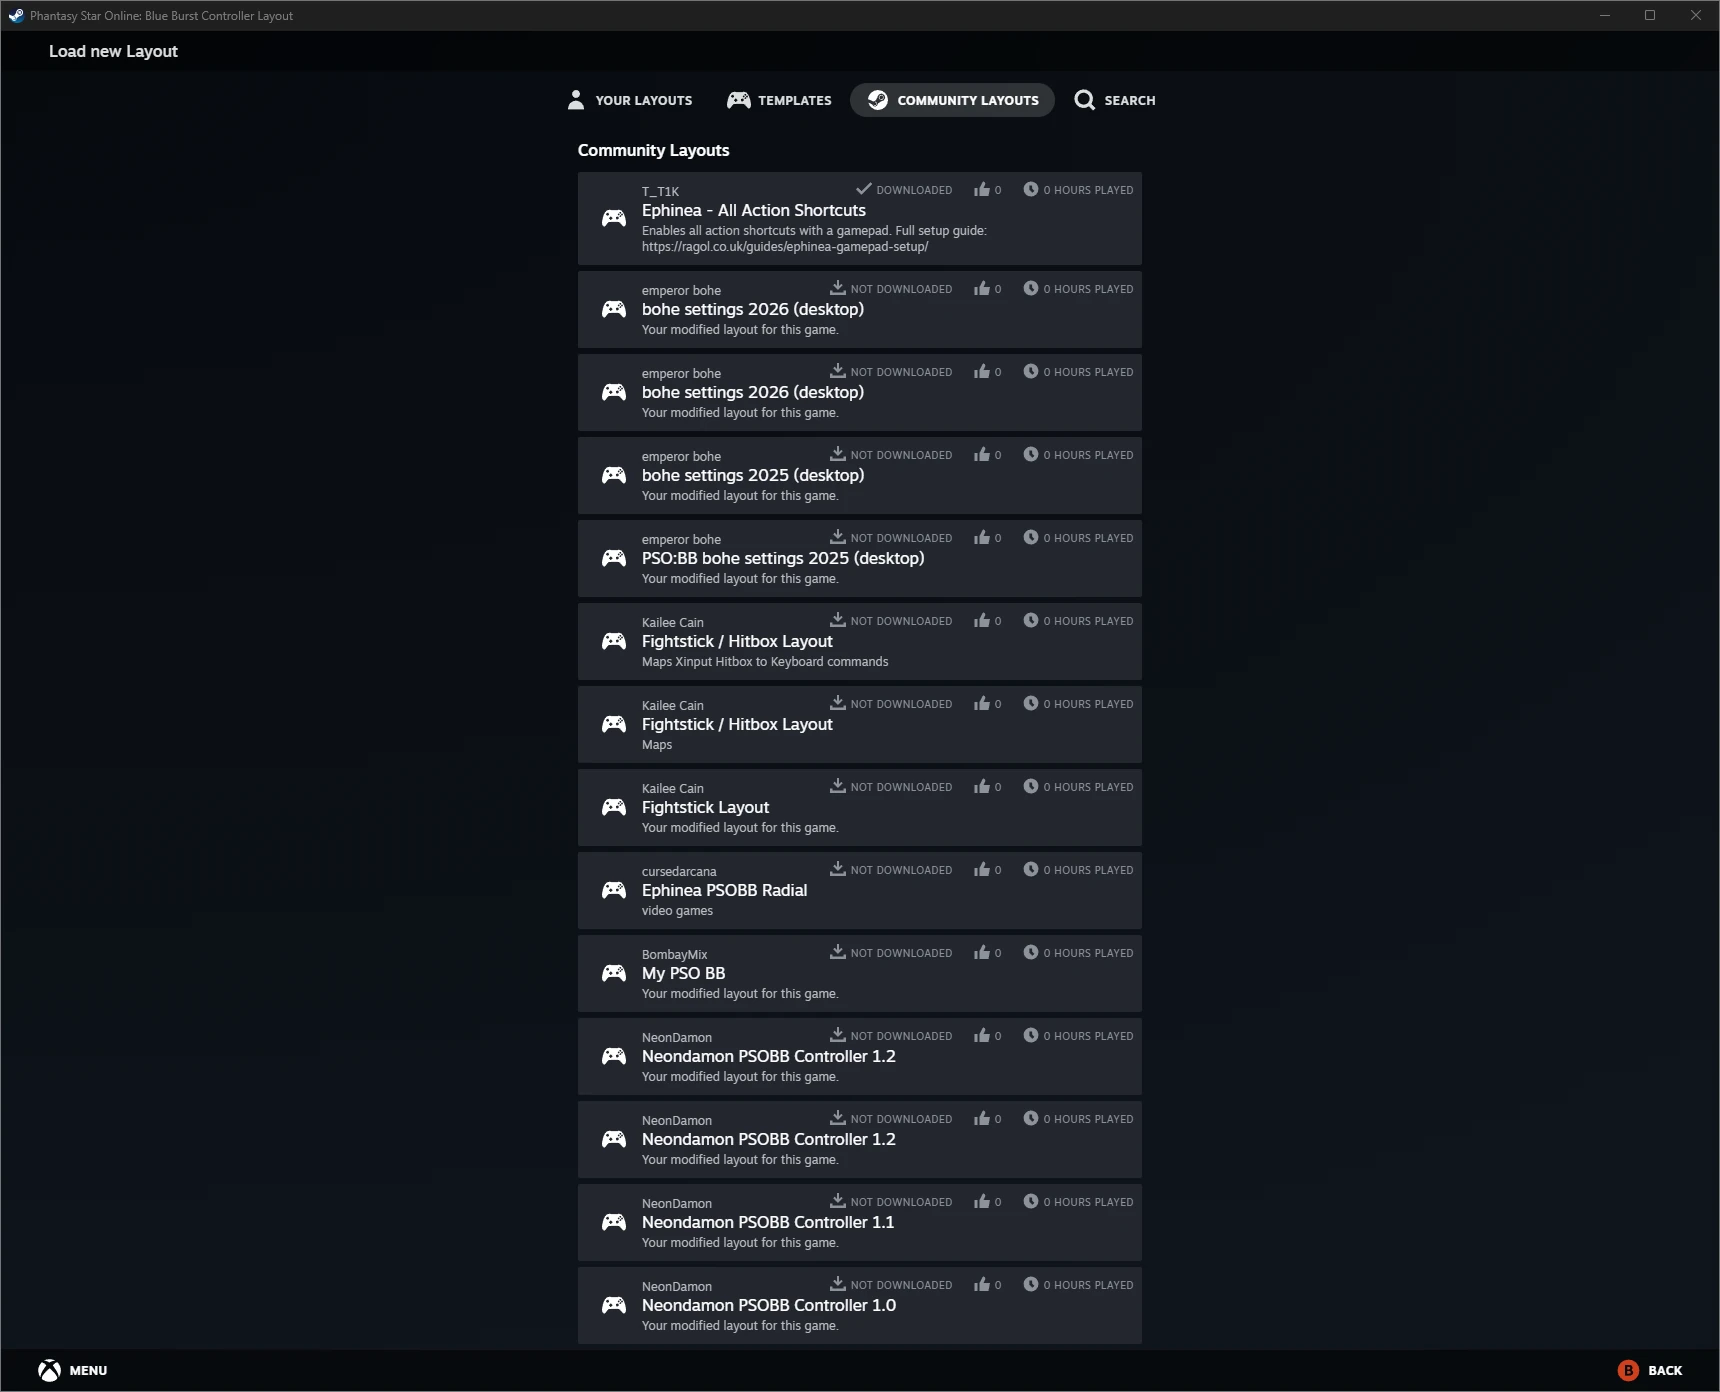
Step 3 - Apply a Steam Button Layout
Apply the Ephinea - All Action Shortcuts community layout instead of creating one from scratch. This layout includes all the mappings above and you can customise it later to suit your preferences.
- Click Gamepad.
- Click Community Layouts at the top.
- Click Show All Layouts at the bottom.
- Click Ephinea - All Action Shortcuts.
- Click Apply Layout.
Tip: If you can’t find the community button layout on Steam, drop a message on our Discord or Forums for help.
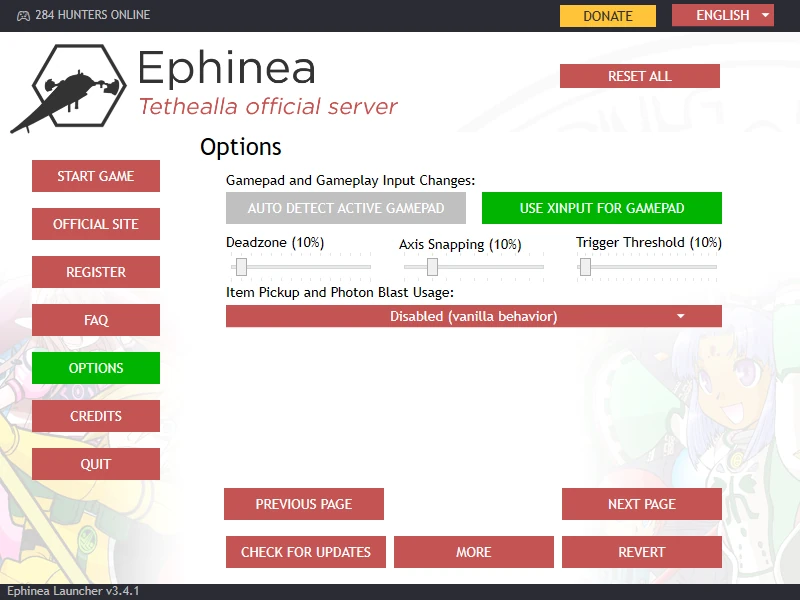
Step 4 - Enable Gamepad
Enable your gamepad in the Ephinea Launcher (Options → Page 4 → Use XInput for Gamepad).
Tip: If you’re on Steam Deck, you don’t need to enable this.
Step 5 - Enable Analog Camera Control
By default, the game uses a Chase Cam that slowly adjusts behind your character, but you can enable manual camera control using the right stick for a more modern feel.
- Enable Analog Camera Control (Options → Page 3 → Analog Camera Control → Enabled).
- Invert Analog X-Axis (Options → Page 3 → Analog Sensitivity → Invert).
- Disable Chase Cam (Options → Page 3 → Chase Cam → Disabled).

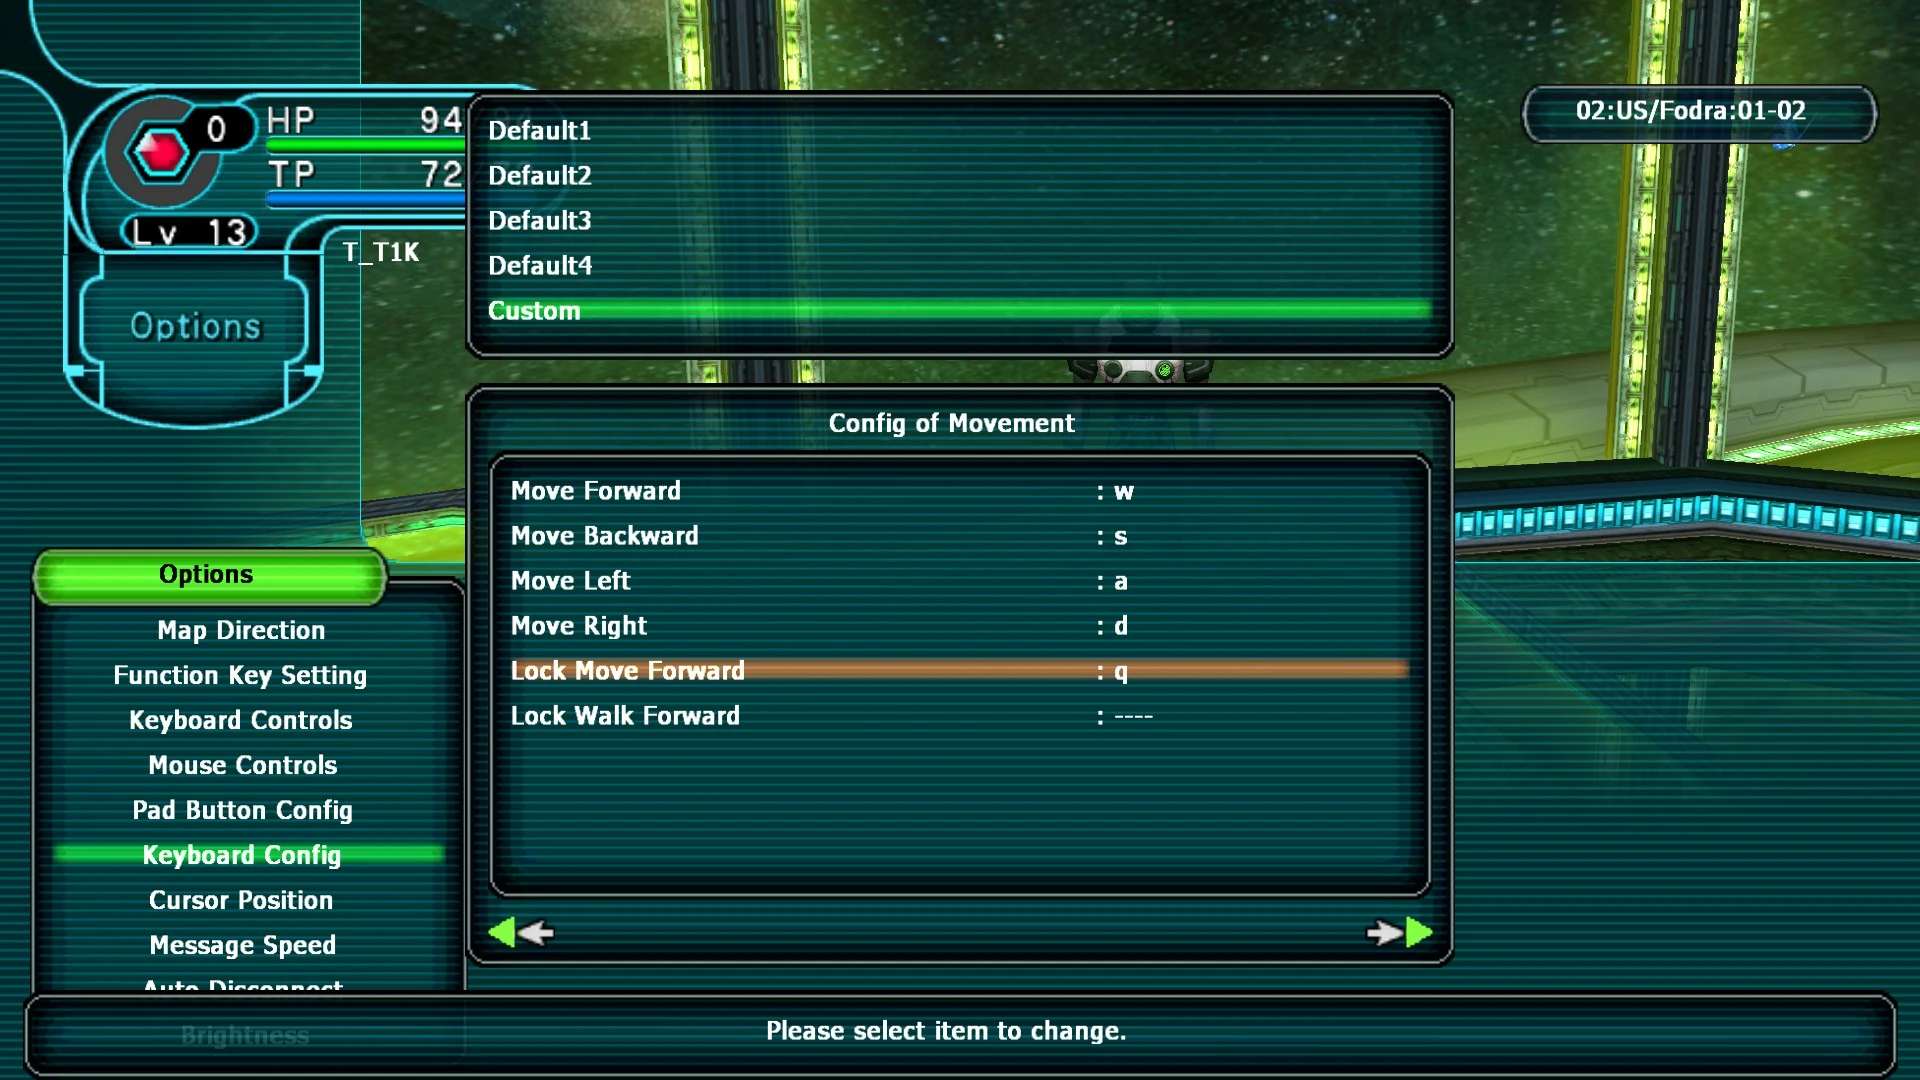
Step 6 - Update Keyboard Mappings
Update the in-game keyboard mappings (Menu → Options → Keyboard Config → Custom).
Tip: The
Qkey (Auto Run) is not mapped by default.
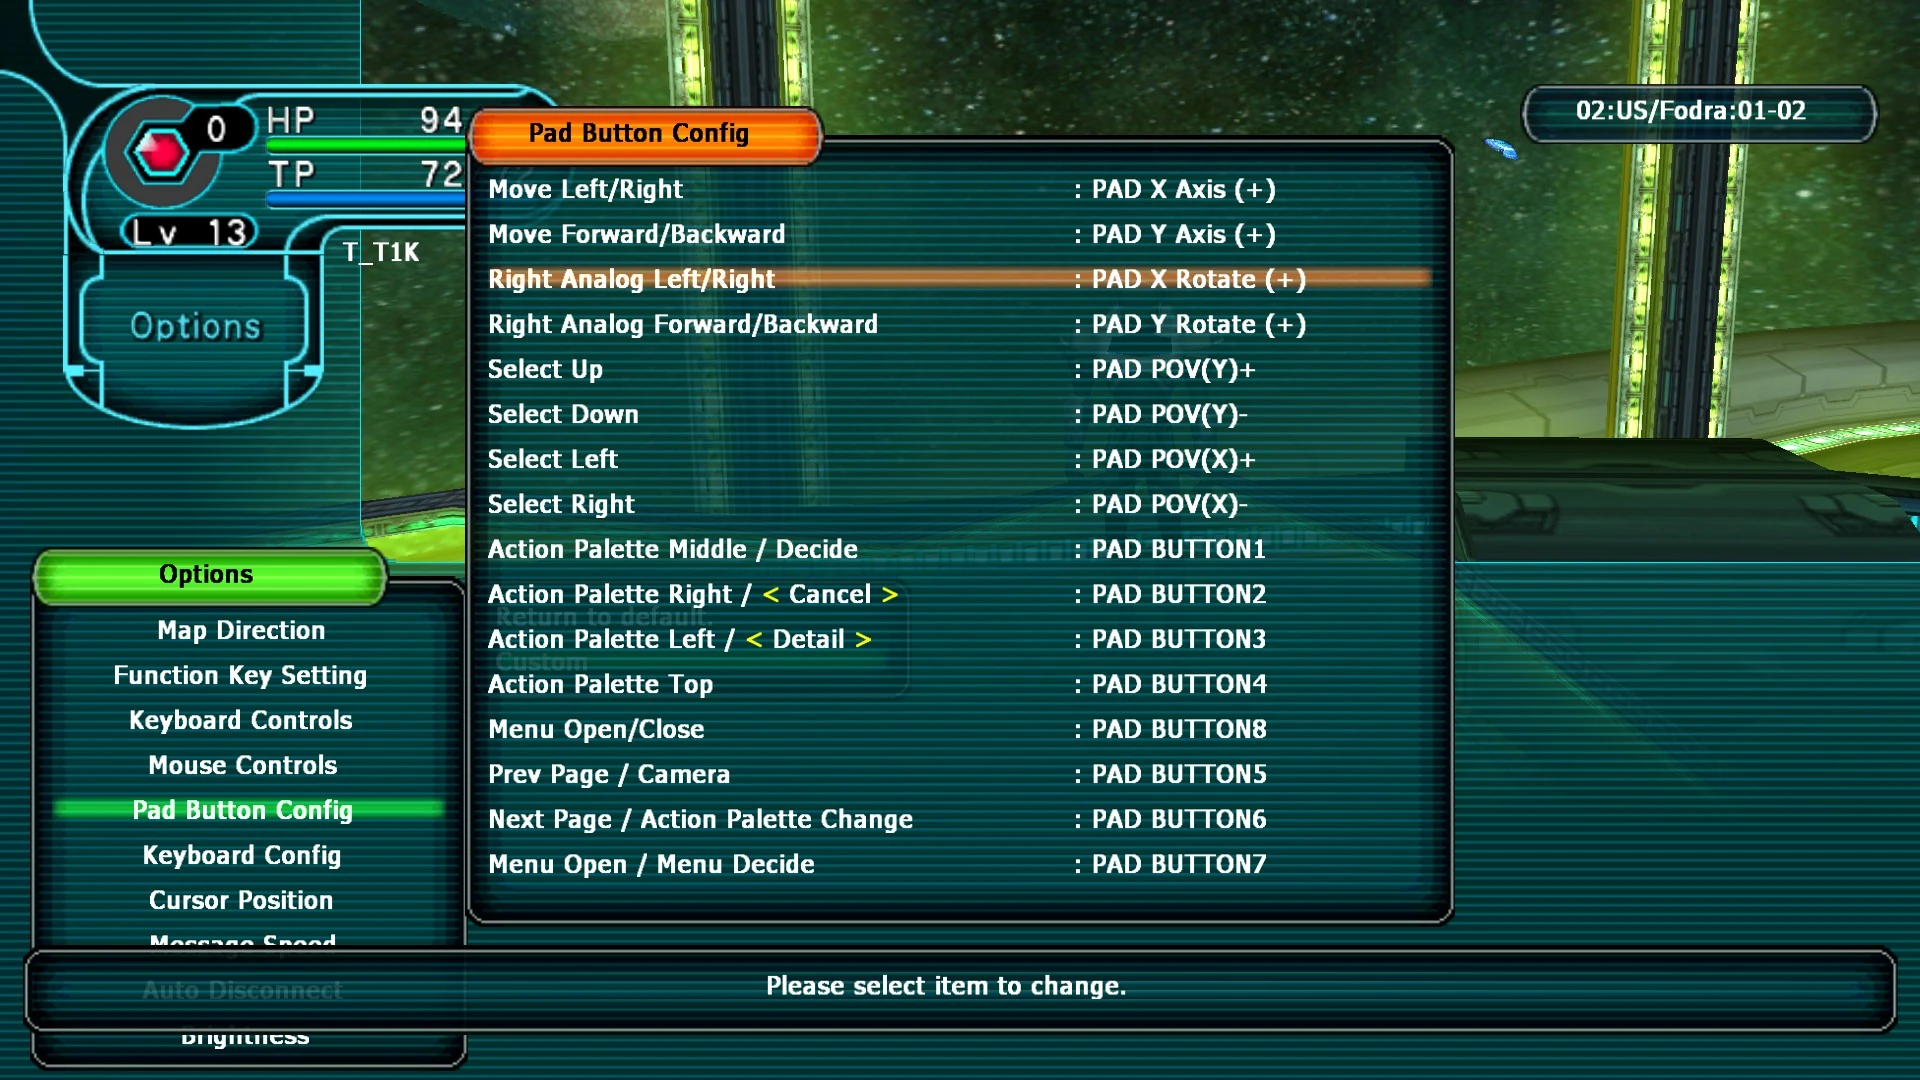
Step 7 - Update Gamepad Mappings
Update the in-game button mappings (Menu → Options → Pad Button Config).
- Set Right Analog Left/Right to
Right Stick. - Set Action Palette Middle / Decide to
A. - Set Action Palette Right / < Cancel > to
B. - Set Action Palette Left / < Detail > to
X. - Set Action Palette Top to
Y. - Set Menu Open/Close to
Menu. - Set Prev Page / Camera to
LB. - Set Next Page / Action Palette Change to
RB.
Tip: Use the D-pad (
←/→) to adjust behaviour for some mappings.
Step 8 - Enable Ctrl Shortcuts
Finally, enable Ctrl Shortcuts by typing /shortcuts in-game.
Tip: This is required for shortcuts like the map (
Ctrl + M).

Step 9 - Finished
Your gamepad should now be fully configured for Ephinea with support for all action shortcuts and improved camera control.
FAQs
What are the Menu and View gamepad buttons?
These are the two centre buttons on an Xbox Series X/S gamepad, referred to as Start and Select in Steam Button Layouts.
Can I use a Steam Deck or other non-Xbox controller?
Yes. The guide uses an Xbox Series X/S controller as an example. Steam Deck and most modern controllers, including the PlayStation 5 DualSense, are supported. Button labels may differ.
I can’t find the community button layout on Steam
If you can’t find it, ask for help on our Discord or Forums.
I get the error “XInput support requires Windows 8 or greater. XInput will be disabled.”
If you’re on Steam Deck, you don’t need to enable XInput.
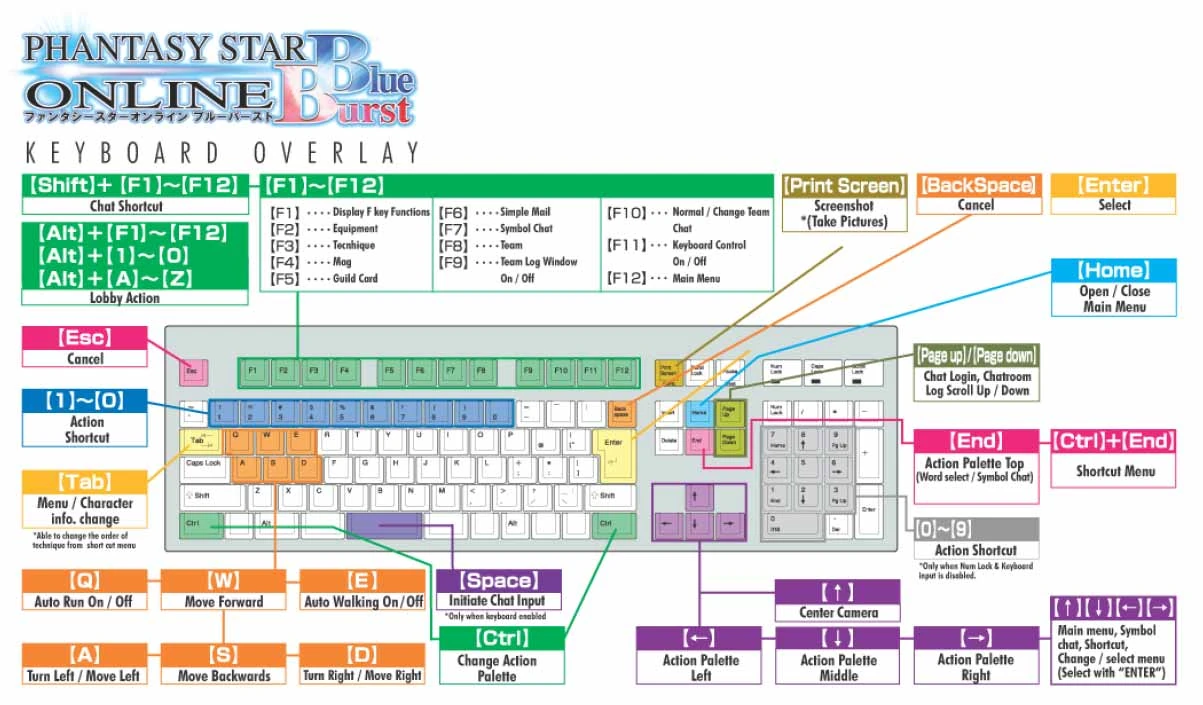
Original Keyboard Mappings
For reference, here are the original keyboard mappings.